Wake Up to Perfectly Curled Lashes
A lash lift is one of the most impactful beauty treatments you can get. It curls your natural lashes from the base, making them look dramatically longer, thicker, and more voluminous—no curler or messy extensions required! The results last for weeks, but the salon cost adds up quickly.
The Sassy Saints Lash Lift Kit [Affiliate Link] allows you to achieve that professional, wide-eyed curl at home, safely and for a fraction of the cost. Here is the complete beginner’s guide.
Section 1: Pre-Treatment Must-Dos
While the process is straightforward, preparation is key for beautiful, uniform results and safety.
- Patch Test: Absolutely essential. Apply a tiny amount of the perming and setting lotions behind your ear or on your inner arm 48 hours before treatment to check for any reaction.
- Cleanse: Wash your entire eye area with an oil-free cleanser. Lashes must be completely free of makeup, mascara, and residue.
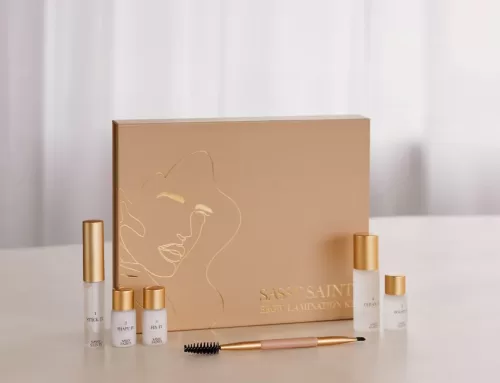
- Gather Your Tools: You will need the Sassy Saints Lash Lift Kit [Affiliate Link], cotton pads, Q-tips, and a steady hand.
Safety Note: Keep the solutions away from your inner eye. Work slowly and carefully.
Section 2: The Lash Lift Tutorial—4 Essential Steps
The Sassy Saints kit is streamlined into four easy steps that mimic the salon process.
Step 1: Prep and Glue
- Choose the Pad: Select the correct size silicone lifting pad (S, M, or L) based on your lash length. A smaller pad gives a more dramatic curl; a larger one gives a softer, more natural curl.
- Affix the Pad: Apply the included lash adhesive to the back of the silicone pad and stick it securely onto your eyelid, as close to the lash line as possible.
- Lift the Lashes: Apply a thin line of adhesive onto the front of the pad. Now, using the Y-brush or a clean tool, brush your lashes straight up and press them against the pad until every single lash is firmly stuck down. This is the most critical step for the final shape!
Step 2: The Lift (Perm Solution)
- Apply a thin, even layer of the Perm Solution (Lifting Cream) only to the middle-to-base section of your lashes (the root area). Avoid the tips.
- Cover the area with small pieces of cling film to activate the solution.
- Process Time: Follow the specific time guidelines in your kit (typically 8–12 minutes).
- Remove the cling film and completely wipe off the Perm Solution with a dry Q-tip.
Step 3: The Set (Fixing Solution)
- Immediately apply the Fixing Solution (Neutralizing Cream) to the exact same middle-to-base section of the lashes. This solution locks the curl in place.
- Cover with new pieces of cling film.
- Process Time: Process for the same duration as the Perm Solution.
- Remove the cling film and wipe off the Fixing Solution.
Step 4: The Nourish & Reveal
- Apply the Nourishing Oil (Keratin Treatment) generously to the lashes.
- Let it sit for 2–3 minutes.
- Carefully use a Q-tip or soft, wet cotton pad to dissolve the adhesive and gently peel the silicone pad off your eyelid. Your lashes will reveal a dramatic, beautiful curl!
Section 3: Aftercare for Lasting Results
- Keep them Dry: Avoid water, steam, mascara, and oils for the first 24 hours to let the curl fully set.
- Longevity: A Sassy Saints Lash Lift can last for 6–8 weeks.
Stop wrestling with your lash curler every morning. Get the life-changing results of a lash lift right from your vanity.
👀 Ready for effortlessly perfect lashes? Get the Sassy Saints Lash Lift Kit here and never use a curler again! Get Now